I mentioned a while ago that I was becoming unhappy with Google’s attitude to openness with Android phones. I felt that I would end up rooting and installing a more open ROM at some point. That point has arrived; triggered by Google automatically upgrading Google Market on my phone, using up the tiny bit of spare space that is on the HTC Desire (it’s one major flaw is the dependence on a relatively tiny internal flash memory). It’s particularly galling because I have loads of space on the attached SD card. HTC have also moved on to other phones and left the Desire languishing on version 2.2 of Android; while 2.3 is well into it’s development cycle.
Advantages:
- Gingerbread is faster than Froyo.
- Fancy graphical effects.
- More free memory and storage. Both the manufacturer and the carrier (Orange, I’m looking at you) add their own junk to the phone. While HTC’s Sense interface is very nice; there is a lot of other stuff you really don’t need.
- I’m more in control. The gatekeepers have been fired.
Disadvantages:
- Your warranty is likely void if you do this. Since we’re talking about HTC Desires — yours probably is too, since it’s about two years old now.
- It’s not for the faint of heart. Equally, it’s not rocket science either.
- If things really did go badly, it’s not impossible that you could brick your phone. I’m not saying it’s likely, but the possibility is there. The possibility that you drop it down the toilet is there as well of course; it’s just not particularly likely. I think you’d have to try quite hard to permanently brick your phone.
That’s the justification; here then is how I installed Cyanogenmod 7.1 on my HTC Desire. There are an awful lot of “howtos†out there already, but they all seem to leave out bits and aren’t clear about some steps, leaving them to a single sentence. “Backup your phoneâ€. Great, how do I do that? I’ve tried to be thorough here, so it’s long, but hopefully it’ll leave you knowing what to expect and hence reduce the scariness factor.
Rooting
The whole process begins with rooting. Rooting is the process of getting superuser permissions on your phone, which gives you a whole lot more access. This step is the one that is phone specific; it mostly relies on exploiting a security hole in the particular phone. Once you’ve got root, the process of installing Cyanogenmod would be pretty similar for any phone.
On a HTC Desire (and in fact a number of other HTC phones), there is a very nice one-click rooter called Unrevoked. It’s cross-platform and includes a built in recovery image (see below for information about a recovery image). Download it, extract it, and run the single executable (I had to run it with root permissions to get at the USB, kdesudo ./reflash). I used the Linux version, but there are versions for Windows and OSX too.
Until we have root we can’t use any of the backup tools either, so this is the only step that needs a leap of faith. Take a deep breath then, watch it happen on video first, and go for it.
Once Unrevoked is running, activate “USB Debugging†on your phone. Applications->Development->USB Debugging. Make sure you have some free space (I think 20MB is needed) on the internal phone memory, Unrevoked will use it as a staging area. Unrevoked will pop up a box after it detects the phone, this is your last chance to abort. Once this is running do not pull the cable, do not close the application. Unrevoked will try hard not to do anything until the last minute, and it will try not to leave your phone half rooted, but it’s better not to mess around when flashing is in progress.
Unrevoked will push the files it needs to the phone; reboot; then run the exploit, allowing it to get root on the next boot (this is what gets you root on demand); it will reboot again and use the new root facility to set up to install the recovery image; then it will reboot one final time and will show you ClockworkMod Recovery actually installing to the recovery partition of the phone. You should touch nothing and do nothing with the phone until you get the “This was a triumph†message from Unrevoked.
I had a bit of trouble with my wife’s phone (yes I did hers too), it failed the first time with a “failed to get root, is your firmware too newâ€. I set the USB mode to “disk driveâ€; activated Applications from unknown sources and tried again and it worked fine. Who knows?
Once you have your phone back in your control, you can disable USB debugging and pull the cable. We’ll be working mostly with the phone only for a while now.
(If you’re not using Unrevoked, and you got root another way, you can download the ROM Manager app once you have root and flash ClockworkMod recovery that way).
Backups
It’s tempting to run straight for the new install. Not yet though. We’ve got to backup what we’ve got now while it’s in a known-good condition.
- Firstly, we want to be able to go back to where we started if everything goes horribly wrong (or you just don’t like CyanogenMod).
- Secondly, we want get our apps and settings back to the greatest extent we can manage once we are done and faced with a blank phone.
Apart from the apps installed on it; the SD card goes unmolested during the upgrade process, so we can use it to store our backups. There are two separate backups we perform.
- A byte-for-byte copy of the partitions on the phone. This is the one that will get us back to exactly where we are now. This backup is done using the ClockworkMod recovery image that got flashed during our rooting process.
- An operating system level backup, per application of the application and application settings. This is what we’ll use to get our currently installed apps and settings into CyanogenMod later. We’ll use a new application called Titanium Backup to do this. Titanium Backup requires root privileges, which is why we couldn’t use this until we had rooted the phone. Note: a lot of the apps on your HTC phone are HTC-specific applications (they’re also a lot of bloat); we will not be restoring them, but we will back them up.
ClockworkMod Backup
Let’s use the best of our new facilities: ClockworkMod recovery. This is a small program that runs instead of the main phone operating system. Because it isn’t running under the operating system it wants to backup, it can safely access every byte of the phone as a perfect snapshot.
Reboot your phone; while it is switching on hold the Power and Volume Down buttons. This gets you into the phone ROM boot menu, a program called HBOOT.

HBOOT
From this menu, you can run the recovery image. Follow the on-screen instructions, press <Vol Down>, and then push <Power> to run “Recoveryâ€. This will get you a similar style of menu from ClockworkMod.

ClockworkMod Top
Be very careful here; with great power comes great responsibility. There is plenty we can do with ClockworkMod, but at the moment we’re performing a backup. Use the <Vol Down> button to scroll down to “backup and restoreâ€; this time use the optical track button to select. Now choose “Backupâ€.
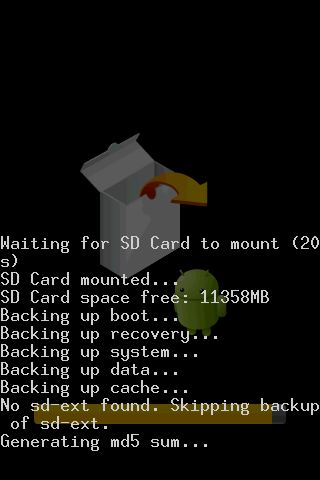
ClockworkMod Backup
You’ll get a little text window reporting on the backup process. This takes a while as it copies everything on the phone’s internal flash, and the .android_secure directory of your SD card into a dated directory under /clockworkmod/backup/ also on your SD card.
Now, breathe a little sigh of relief. Your phone data is now safer than it has ever been. (In fact, you can now reboot into the full phone mode and copy that backup onto your PC if you want some extra peace of mind.) With this snapshot in place, you can now return to this phone state whenever you like. If you wanted to stop now, you’ve already done yourself a lot of good.
You’ll be returned to the ClockworkMod top menu, where you should “reboot system nowâ€.
SMS Backup+
You should already have this installed and running, it doesn’t need root and is very handy as it puts your SMS messages in email form into your GMail account.
If you haven’t already, set it up to point at its own folder in your GMail account and backup your SMS messages and call log. These are worth backing up separately because you’ll be moving from HTC apps to Android/Cyanogen apps for these functions and so Titanium Backup can’t restore settings across application types (it seems to say it can in the menu, but it didn’t work for me, so do it with SMS Backup+ for safety. This’ll take a while, so put a film on. My wife had over 5,000 messages and it took hours — wtf?
Titanium Backup
Go to the market and search for and install “Titanium Backupâ€. This is another star application, and if all you got out of your rooting was access to this application then you’ve also done well. It can backup individual applications and settings on your SD card, again leaving your data much safer. Titanium Backup needs “USB Debugging†and “Install from Unknown Sources†activating.
Go to the “Backup/Restore†tab and have a look at all the individual apps you could backup one at a time. Don’t bother though; instead push the menu button and choose “Batchâ€, then “Backup all user apps + system dataâ€.
CyanogenMod
The install for CyanogenMod is done using ClockworkMod. You should be able to see in the screenshot of the menu from above an option labelled “install zip from sdcardâ€. We’ll be needing to put a zip on our SD card.
The CyanogenMod images are built for specific phones, we (in the UK) want the HTC Desire GSM image. At time of writing, the latest stable is 7.1 released just a few days ago. Go grab it.
Cyanogen aren’t allowed to distribute the Google applications with their release. No matter, they are easily available from a number of places. Sniff around for a recent archive. You can also get individually wrapped applications; but to be honest there is plenty of space on the system partition that they’re going to get installed to, so it’s not really worth being that precious about space; just get the lot.
You should also get the latest copy of the radio chip’s firmware as the later versions of Cyanogen won’t work with really early radio firmwares. It’s just another zip as far as we’re concerned.
Copy these three zips to your SD card, just as you would copy any other file.
Here we go then; check you’re backups are where you think they are. Check they’re all a reasonable size. Check your SMS messages and call log are in the right place in your GMail account. Take a note of any icon and widget placements that are important to you, as they won’t be restored. Your Wi-Fi access points got backed up by Titanium Backup, so you needn’t worry about finding those passwords again (thank goodness).
Reboot to ClockworkMod as you did last time, <Vol Down> and <Power> during reboot. Follow the official instructions if you wish; but it boils down to this:
- Select “wipe data/factory resetâ€. This is the biggie; your phone is blank after doing this. Don’t worry though: you could get it back using the restore option from the backup you made earlier. You don’t want it back though, you want it upgraded.
- Select “wipe cache partitionâ€. Not strictly necessary, a cache doesn’t have anything vital in it.
- Select “install zip from sdcardâ€
- Select “choose zip from sdcardâ€
This last option loads whatever zip you pick. You will use this option repeatedly. Do them in this order:
- Radio firmware
- CyanogenMod
- Google apps
These will all be pretty quick; once done you can reboot into your new operating system. Your first indication will be the CyanogenMod skateboarding android. Don’t worry that the first boot takes a long time, it is simply that the caches are being repopulated. Future boots will be back to being as fast as they ever were.
Initialisation
As with the first time you got your phone; you will be prompted for your Google account details. Go through the motions. When you’re asked about installing some apps from the market, just cancel the process. You’re restoring from backups so don’t need to do that.
Once your account details are entered, the phone will sync your contacts and calendar automatically.
Restoration
This is primarily done from Titanium Backup. I suggest you first restore the Wi-Fi backup and you’re back to roaming around your friend’s Internet connections. Next restore SMS Backup+ and then restore your call log and messages. Then your phone is back to being a phone. While the messages are being restored, don’t restore any messaging replacement app (like Handcent); you can bust the time and date stamps.
Your biggest problem on the HTC Desire is internal phone memory. Titanium Backup can help you in this area, but you have to set an option. Use menu->preference->restore backups to... and select “Original location†or “External mediaâ€.
Strangely, this is the step that will take you the most time, and requires a bit of care. You won’t want to blindly install everything that got backed up. Certainly avoid restoring anything with HTC in the name; also avoid restoring anything that has an equivalent already on the phone. My suggested strategy is to restore the apps you know you got from the market straight away; then only restore on an as needed basis, i.e. when you notice something is missing. This will prevent you from ending up with a load of non-functional HTC apps taking up your valuable space.
— Update
Handy multi-device rooting software.